TL;DR:
- Most toilet repairs are DIY-friendly and cost less than professional services.
- Replacing a flapper or adjusting the float can stop a running toilet.
- Regular maintenance prevents costly water wastage and structural damage.
That persistent hiss or trickle from your loo is more than just annoying. A running toilet wastes up to 200 gallons of water every single day, quietly inflating your water bills while you sleep. The good news? Most toilet faults, from running cisterns to stubborn base leaks, are well within reach for any homeowner willing to follow clear instructions. You don't need specialist skills or expensive call-outs. This guide walks you through every major toilet repair in plain language, with practical tips tailored to homes across the Thames Valley region.
Table of Contents
- What you'll need: tools and materials for common toilet repairs
- Step-by-step: repairing a running toilet
- Unclogging toilets: safe methods and common mistakes
- Fixing leaks at the toilet base
- Prevention and routine maintenance tips
- Why DIY toilet repair beats calling a plumber (most of the time)
- Need a hand with tricky toilet repairs?
- Frequently asked questions
Key Takeaways
| Point | Details |
|---|---|
| DIY lowers bills | Most toilet repairs can be done yourself, saving hundreds of pounds over a plumber. |
| Right tools, right fix | A basic toolkit and the right parts solve nearly all common toilet faults smoothly. |
| Act fast to prevent damage | Fixing leaks and running toilets promptly avoids costly water waste and floor damage. |
| Prevention is best | Annual checks and using only proper loo paper will extend your toilet’s lifespan. |
What you'll need: tools and materials for common toilet repairs
Before you get your hands wet, you'll want the right tools and some inexpensive materials at the ready. Rummaging through kitchen drawers mid-repair is a recipe for frustration, especially if your local hardware shop closes at five.
Here's what to gather before you start:
- Adjustable spanner for tightening or loosening water supply nuts
- Rubber gloves to keep things hygienic
- Large sponge and old towels to soak up water in and around the cistern
- Small container or bowl for bailing out residual water
- Flat-head and cross-head screwdrivers for panel fixings
For materials, the most useful items to have on hand are:
| Repair type | Part needed | Average cost |
|---|---|---|
| Running toilet | Replacement flapper | £3 to £8 |
| Fill valve fault | New fill valve | £8 to £20 |
| Base leak | Wax ring | £5 to £12 |
| Leak testing | Food colouring or dye tablets | Under £2 |
| Clog | Classic flange plunger | £6 to £15 |
The most common DIY toilet repair is fixing a running toilet by testing and replacing the flapper, so buying a spare flapper is always a smart move. You can also use food colouring from your kitchen as a dye test, and a wire coat hanger with a taped tip works as a basic auger in a pinch.
Always turn off the water supply before touching any internal components. The shut-off valve is typically located behind or below the toilet. It's also wise to be familiar with fixing leaking pipes in general, since the same precautions apply. If you're unsure whether you have a leak elsewhere, it helps to detect water leaks before starting your repair.
Pro Tip: Pop everything into a small bucket or tray so nothing rolls away under the toilet. Gather all parts before starting; shops may well be closed before you finish.
Step-by-step: repairing a running toilet
With tools and parts ready, let's get into stopping that endless running sound for good.
- Turn off the water supply at the shut-off valve, then flush to drain the cistern.
- Remove the cistern lid and set it aside carefully on a towel.
- Identify the flapper. It's the rubber seal at the bottom of the cistern that covers the flush valve opening.
- Drop food colouring into the cistern and wait 15 minutes without flushing. If colour appears in the bowl, your flapper is leaking.
- Disconnect the flapper chain from the flush handle arm and unhook the flapper from its mounting pegs.
- Fit the new flapper by reversing these steps. Ensure the flapper chain has 1/2 inch slack when the flapper is closed. Too much slack means it won't lift fully; too little means it won't seal.
- Turn the water back on and listen. If the running stops, you're done.
If it still runs after replacing the flapper, the fill valve is likely at fault. You'll need to replace fill valve components by turning off the water, removing the old valve, and fitting the new one according to the manufacturer's instructions. Adjust the float height so water sits roughly 2.5 cm below the overflow tube.
| Symptom | Likely cause | Fix |
|---|---|---|
| Water runs continuously | Worn flapper | Replace flapper |
| Cistern refills slowly | Faulty fill valve | Replace fill valve |
| Water runs into overflow | Float set too high | Adjust float height |
Use our flapper leak test guide if you want a more detailed walkthrough of the dye method. Catching this early also helps you spot plumbing leaks before they become costly surprises.
Pro Tip: Never overtighten plastic fittings. Hand-tight plus a quarter turn is enough. Forcing them can crack the valve body and create a bigger problem than you started with.
Unclogging toilets: safe methods and common mistakes
Once your toilet stops running, the next issue many encounter is a stubborn clog. Before you reach for harsh chemicals, there are safer and more effective approaches worth trying first.
The flange plunger is the right tool for toilet unblocking, not the flat cup plunger designed for sinks. A flange plunger has a rubber extension that fits into the toilet outlet, creating a proper seal. Without that seal, you're just splashing water rather than building pressure.
How to plunge correctly:
- Insert the flange into the toilet outlet so it sits snugly
- Push down slowly to remove air, then pump with firm, even strokes
- Maintain the seal throughout; lifting the plunger breaks the suction
- Repeat 10 to 15 times before checking if water drains
For clogs caused by paper or soft material, hot water can dissolve the blockage without any tools. Pour water from waist height into the bowl; the force and heat combined can shift the clog. Never use boiling water as it can crack the porcelain.
Warning: Excessive force with a plunger or a hanger can crack the porcelain bowl or damage the internal trap. Work steadily, not frantically.
For deeper blockages, a wire coat hanger with the end taped in plastic can reach further into the trap. A proper toilet auger is even better if you have one. Avoid chemical drain unblockers where possible. They can corrode older pipe fittings and often don't work on solid blockages.
If you've tried twice with no result, it may be time to seek more toilet unblocking tips or call in a professional before the situation worsens.
Fixing leaks at the toilet base
Aside from inner tank problems, leaks around the base pose risks to your floor and your home's structural health. Water sitting beneath a toilet can quietly rot floorboards and encourage mould growth over time.

Step 1: Dry the floor completely around the toilet base. Flush once and watch carefully. If water seeps out at the base during or after flushing, you have a base leak.
Step 2: Try tightening the T-bolts. These are the two bolts at the base of the toilet, usually hidden under plastic caps. Prise off the caps, check if the nuts are loose, and tighten them evenly. A quarter turn at a time on each side prevents the toilet from rocking unevenly.
Caution: Overtightening T-bolts can crack the porcelain base or damage the floor flange. Stop as soon as resistance is firm.
Step 3: If the leak persists after tightening, the wax ring likely needs replacing. This requires lifting the toilet fully off the floor. Turn off the water, flush and sponge out the cistern, disconnect the supply hose, unscrew the T-bolts, and carefully lift the toilet straight up.
Step 4: Scrape off the old wax ring from both the floor flange and the toilet base. Press the new wax ring onto the toilet outlet, then lower the toilet straight down onto the flange bolts. Press down firmly and evenly.
The process of quick plumbing fixes at home shares the same principle: tackle small faults before they spread. For reference on comparing repair methods, the gutter leak repair comparison approach of tighten first, then replace seals applies here too.
Pro Tip: This job is much easier with two people. One holds the toilet steady while the other guides it onto the bolts. Going it alone risks misalignment and a wasted wax ring.
Prevention and routine maintenance tips
Once repairs are sorted, you can keep future disasters at bay with a few easy habits practised throughout the year.
Annual checks to carry out:
- Inspect the flapper for warping, stiffness, or discolouration
- Check the float and water fill level in the cistern
- Test for silent leaks using food colouring in the cistern
- Examine the base and supply connections for moisture
In Thames Valley, hard water accelerates wear on rubber and plastic components significantly faster than in softer water areas. This means flappers and fill valves may need replacing more frequently, sometimes every two to three years rather than five.
Clean the rim holes (the small holes under the toilet rim that direct flush water) with a thin wire or toothbrush once a year. Mineral deposits block these holes over time and lead to weak, incomplete flushes that leave you flushing twice. That doubles your water use unnecessarily.
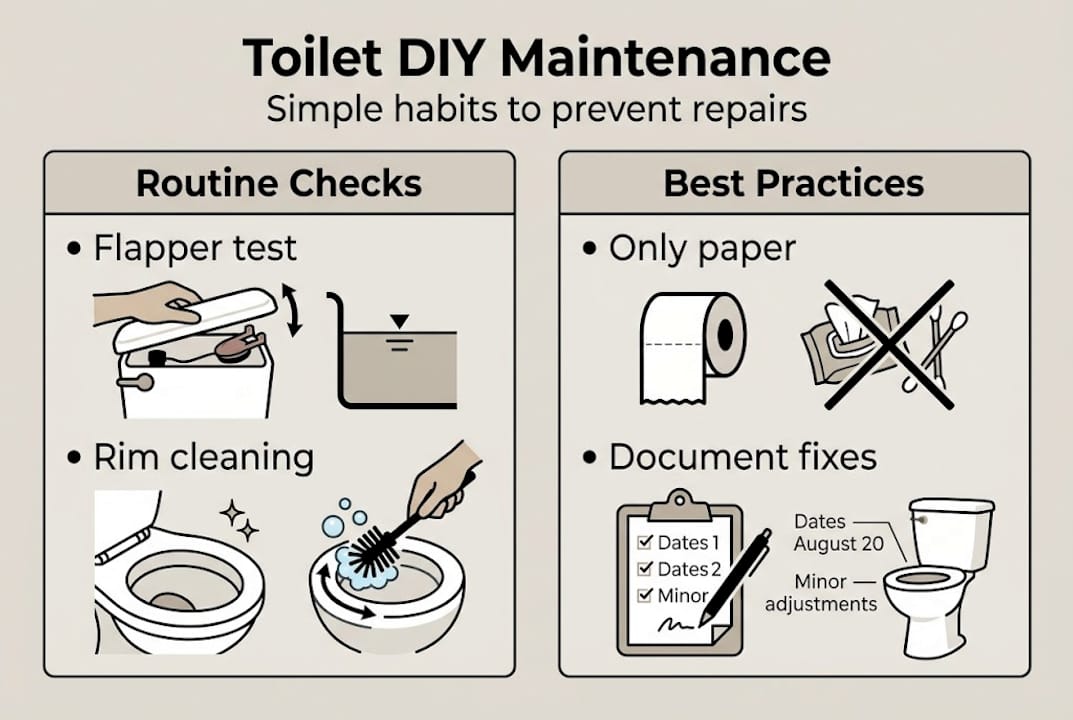
Never flush anything other than toilet paper. Wet wipes, even those labelled "flushable," cause blockages further down the drain. Keep children's toys, cotton wool, and sanitary products away from the loo entirely.
If you ever need to deal with a sudden fault, knowing your emergency plumbing steps in advance saves panic. The same logic applies to heating; reviewing your boiler maintenance checklist once a year keeps your whole home running reliably.
Pro Tip: When you disassemble any part of the cistern, take a photo first. Label parts with sticky notes if needed. You'll thank yourself when it's time to reassemble.
Why DIY toilet repair beats calling a plumber (most of the time)
Most toilet problems genuinely don't need a plumber. They need patience, clear instructions, and about an hour of your time. A flapper costs under £8. A fill valve costs under £20. Compare that to the DIY saves £150 to £400 versus hiring a plumber for the same job. That's a meaningful saving for a straightforward task.
Beyond money, fixing your own toilet builds genuine confidence with your home's systems. You start to understand what's normal and what isn't. That awareness often means catching problems earlier, before they become expensive.
That said, be honest about your limits. Cracked porcelain, persistent leaks after wax ring replacement, or any issue involving the main drain stack are situations where calling a professional is simply the smarter choice. Attempting those repairs without the right experience can cause far more damage than the original fault.
In the Thames Valley, understanding the value of local plumbers matters. When you genuinely need fast professional help, local engineers can arrive quickly and resolve issues safely. Use DIY for the straightforward stuff; reserve professional help for the risks that outweigh the savings.
Pro Tip: Document every repair you carry out with a dated note or phone photo. If you ever sell your home, a clear maintenance record adds credibility and reassures buyers.
Need a hand with tricky toilet repairs?
Some toilet problems are genuinely too risky to tackle alone. Cracked bowls, recurring base leaks, or blockages that keep returning despite your best efforts are signs that something deeper is wrong.

At 999Plumber.co.uk, we cover the full Thames Valley region with 24/7 emergency call-outs, no call-out charges, and a no fix no fee promise. Whether you need an emergency plumber in Newbury or simply want to book a plumber online at a time that suits you, the process is straightforward. Don't let a complex fault cause lasting damage to your floors or pipework. We're here when the DIY route has reached its limit.
Frequently asked questions
How do I test if my toilet flapper is leaking?
Drop food colouring into the cistern and wait 15 minutes without flushing. If colour appears in bowl after that time, your flapper is almost certainly leaking and needs replacing.
What should I do if the toilet leaks at the base after tightening the bolts?
If tightening T-bolts doesn't stop the leak, the wax ring needs replacing and the toilet must be lifted completely off the floor flange to fit a new one.
Can I unclog a toilet without a plunger?
Yes. Pour hot water from waist height for paper-based clogs, or use a wire hanger with the tip wrapped in plastic as a gentle manual tool for deeper blockages.
How often should I check my toilet for leaks and maintenance?
Inspect flappers, floats, and water levels at least once a year, clean rim holes annually, and check around the base after every flush if you suspect a developing leak.
Recommended
- Quick plumbing fixes for Thames Valley homes: a guide
- How to fix leaking pipes fast: step-by-step repair guide
- Spot plumbing leaks early and save costs in 2026
- Emergency plumbing steps: protect your Thames Valley home
- Why Home Maintenance Matters: Save Money, Protect Property – white-diamond-pressure